LINE Messaging API -インベントオブジェクト-
LINEボットを作るのに、Webhookで受けるデータって イベントごとにどんなデータが来てるか、のメモです。
公式のドキュメントはこちら
まず、LINEサーバからMessaging APIに送られてくるイベントは大きく分けて以下。
イベント
- メッセージ
- フォロー
- ブロック
- グループへの参加
- グループからの退会
- グループへの他メンバーの参加
- グループからの他メンバーの退会
- LINEビーコンの受信
おそらく主として使うのは、メッセージイベント。 文字や画像などを送るやつ。 メッセージイベントはさらに、タイプで分岐していてタイプは、以下。
- テキスト
- 画像
- 動画
- 音声
- 位置
- スタンプ
それぞれのイベント時に受信できるデータのjson ファイルはこちら に置いておきます。
中身は以下の通り。
メッセージイベント
- メッセージ テキスト
{
  "events": [
    {
      "type": "message",
      "replyToken": "xxxxxxxxxxxxxxxxxxxxxxxxxxxxxxxx",
      "source": {
        "userId": "xxxxxxxxxxxxxxxxxxxxxxxxxxxxxxxxx",
        "type": "user"
      },
      "timestamp": 0000000000000,
      "message": {
        "type": "text",
        "id": "0000000000000",
        "text": "XXXXXXX"
      }
    }
  ],
  "destination": "xxxxxxxxxxxxxxxxxxxxxxxxxxxxxxxxx"
}
- メッセージ 画像
{
  "events": [
    {
      "type": "message",
      "replyToken": "xxxxxxxxxxxxxxxxxxxxxxxxxxxxxxxx",
      "source": {
        "userId": "xxxxxxxxxxxxxxxxxxxxxxxxxxxxxxxxx",
        "type": "user"
      },
      "timestamp": 0000000000000,
      "message": {
        "type": "image",
        "id": "0000000000000",
        "contentProvider": {
          "type": "line"
        }
      }
    }
  ],
  "destination": "xxxxxxxxxxxxxxxxxxxxxxxxxxxxxxxxx"
}
- メッセージ 動画
{
  "events": [
    {
      "type": "message",
      "replyToken": "xxxxxxxxxxxxxxxxxxxxxxxxxxxxxxxx",
      "source": {
        "userId": "xxxxxxxxxxxxxxxxxxxxxxxxxxxxxxxxx",
        "type": "user"
      },
      "timestamp": 0000000000000,
      "message": {
        "type": "video",
        "id": "0000000000000",
        "contentProvider": {
          "type": "line"
        },
        "duration": 0000
      }
    }
  ],
  "destination": "xxxxxxxxxxxxxxxxxxxxxxxxxxxxxxxxx"
}
- メッセージ 音声
{
  "events": [
    {
      "type": "message",
      "replyToken": "xxxxxxxxxxxxxxxxxxxxxxxxxxxxxxxx",
      "source": {
        "userId": "xxxxxxxxxxxxxxxxxxxxxxxxxxxxxxxxx",
        "type": "user"
      },
      "timestamp": 0000000000000,
      "message": {
        "type": "audio",
        "id": "0000000000000",
        "contentProvider": {
          "type": "line"
        },
        "duration": 0000
      }
    }
  ],
  "destination": "xxxxxxxxxxxxxxxxxxxxxxxxxxxxxxxxx"
}
- メッセージ 位置
{
  "events": [
    {
      "type": "message",
      "replyToken": "xxxxxxxxxxxxxxxxxxxxxxxxxxxxxxxx",
      "source": {
        "userId": "xxxxxxxxxxxxxxxxxxxxxxxxxxxxxxxxx",
        "type": "user"
      },
      "timestamp": 0000000000000,
      "message": {
        "type": "location",
        "id": "0000000000000",
        "address": "?日本、〒000-0000 XX県XXX市XXX0丁目00-00 XXXXXXXXX",
        "latitude": 00.000000,
        "longitude": 000.000000
      }
    }
  ],
  "destination": "xxxxxxxxxxxxxxxxxxxxxxxxxxxxxxxxx"
}
- メッセージ スタンプ
{
  "events": [
    {
      "type": "message",
      "replyToken": "xxxxxxxxxxxxxxxxxxxxxxxxxxxxxxxx",
      "source": {
        "userId": "xxxxxxxxxxxxxxxxxxxxxxxxxxxxxxxxx",
        "type": "user"
      },
      "timestamp": 0000000000000,
      "message": {
        "type": "sticker",
        "id": "0000000000000",
        "stickerId": "00000000",
        "packageId": "0000000"
      }
    }
  ],
  "destination": "xxxxxxxxxxxxxxxxxxxxxxxxxxxxxxxxx"
}
- フォロー
{
  "events": [
    {
      "type": "follow",
      "replyToken": "xxxxxxxxxxxxxxxxxxxxxxxxxxxxxxxx",
      "source": {
        "userId": "xxxxxxxxxxxxxxxxxxxxxxxxxxxxxxxxx",
        "type": "user"
      },
      "timestamp": 0000000000000
    }
  ],
  "destination": "xxxxxxxxxxxxxxxxxxxxxxxxxxxxxxxxx"
}
- ブロック
{
  "events": [
    {
      "type": "unfollow",
      "source": {
        "userId": "xxxxxxxxxxxxxxxxxxxxxxxxxxxxxxxxx",
        "type": "user"
      },
      "timestamp": 0000000000000
    }
  ],
  "destination": "xxxxxxxxxxxxxxxxxxxxxxxxxxxxxxxxx"
}
- グループへの参加
{
  "events": [
    {
      "type": "join",
      "replyToken": "xxxxxxxxxxxxxxxxxxxxxxxxxxxxxxxx",
      "source": {
        "roomId": "xxxxxxxxxxxxxxxxxxxxxxxxxxxxxxxxx",
        "type": "room"
      },
      "timestamp": 0000000000000
    },
    {
      "type": "memberLeft",
      "source": {
        "roomId": "xxxxxxxxxxxxxxxxxxxxxxxxxxxxxxxxx",
        "type": "room"
      },
      "timestamp": 0000000000000,
      "left": {
        "members": [
          {
            "userId": "xxxxxxxxxxxxxxxxxxxxxxxxxxxxxxxxx",
            "type": "user"
          }
        ]
      }
    }
  ],
  "destination": "xxxxxxxxxxxxxxxxxxxxxxxxxxxxxxxxx"
}
- グループからの退会
{
  "events": [
    {
      "type": "leave",
      "source": {
        "groupId": "xxxxxxxxxxxxxxxxxxxxxxxxxxxxxxxxx",
        "type": "group"
      },
      "timestamp": 0000000000000
    }
  ],
  "destination": "xxxxxxxxxxxxxxxxxxxxxxxxxxxxxxxxx"
}
- グループへの他メンバーの参加
{
  "events": [
    {
      "type": "memberJoined",
      "replyToken": "xxxxxxxxxxxxxxxxxxxxxxxxxxxxxxxx",
      "source": {
        "roomId": "xxxxxxxxxxxxxxxxxxxxxxxxxxxxxxxxx",
        "type": "room"
      },
      "timestamp": 0000000000000,
      "joined": {
        "members": [
          {
            "userId": "xxxxxxxxxxxxxxxxxxxxxxxxxxxxxxxxx",
            "type": "user"
          }
        ]
      }
    }
  ],
  "destination": "xxxxxxxxxxxxxxxxxxxxxxxxxxxxxxxxx"
}
- グループからの他メンバーの退会
{
  "events": [
    {
      "type": "memberLeft",
      "source": {
        "roomId": "xxxxxxxxxxxxxxxxxxxxxxxxxxxxxxxxx",
        "type": "room"
      },
      "timestamp": 0000000000000,
      "left": {
        "members": [
          {
            "userId": "xxxxxxxxxxxxxxxxxxxxxxxxxxxxxxxxx",
            "type": "user"
          }
        ]
      }
    }
  ],
  "destination": "xxxxxxxxxxxxxxxxxxxxxxxxxxxxxxxxx"
}
LINE ボットを作る -LINE Messaging API と AWS Lambda を連携させる- その3
AWS API Gateway の設定
ほぼ完全に、このページの通りに作業進めていきます。
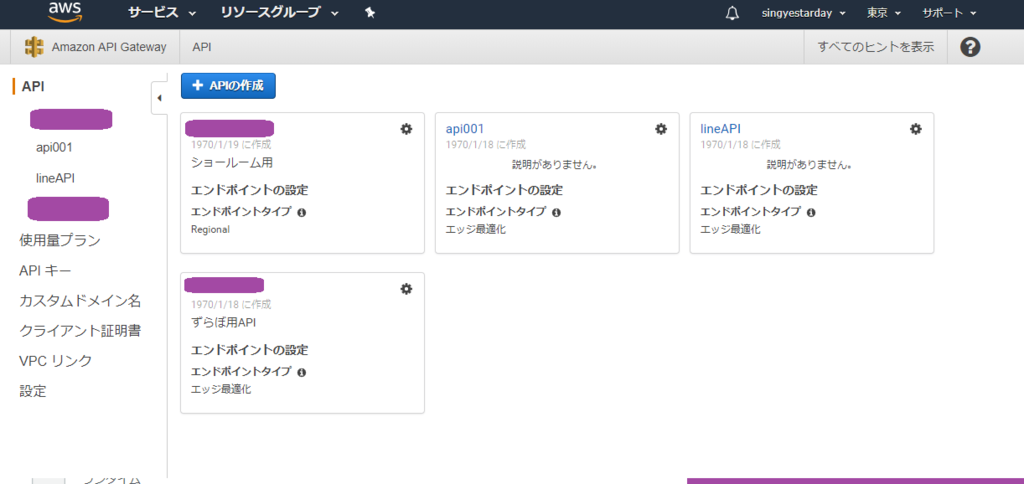
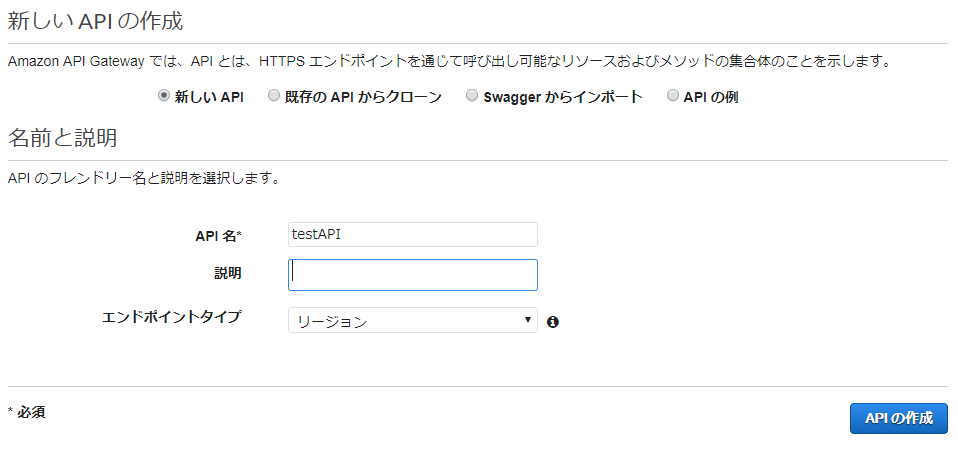
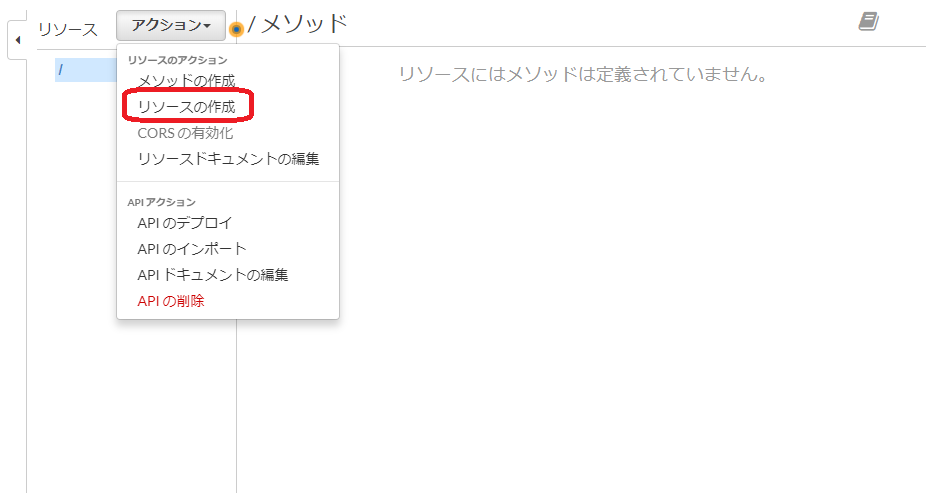
リソースを作る!!
[アクション]からリソースの作成
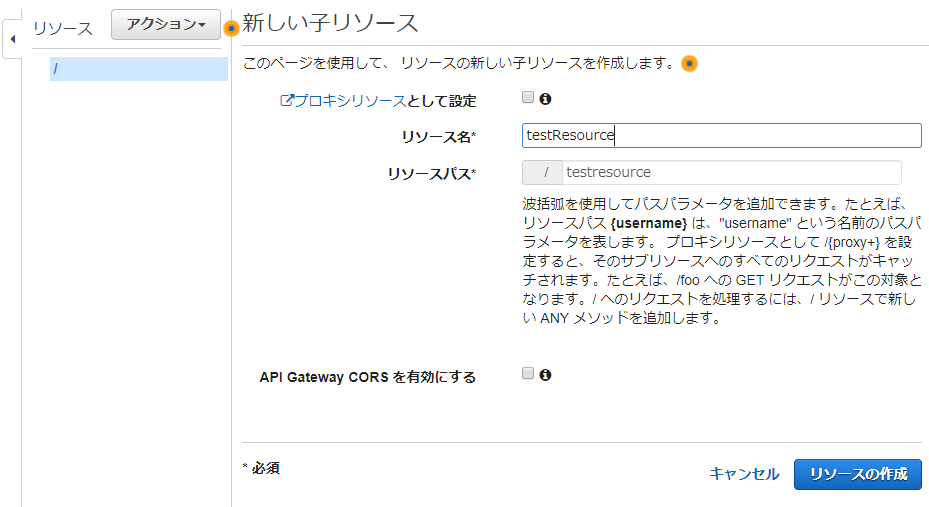
リソース名は適当に。
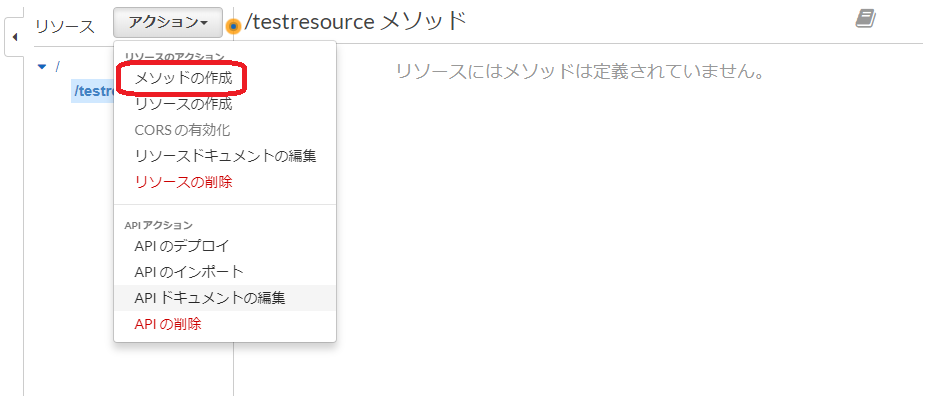
メソッドを作る!!
[アクション]からメソッドの作成
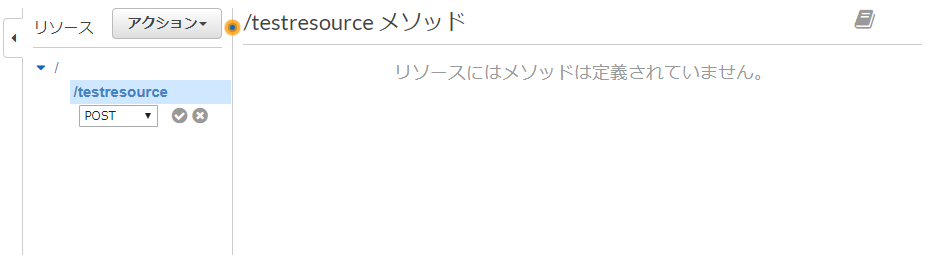
POSTを選択して、チェック。
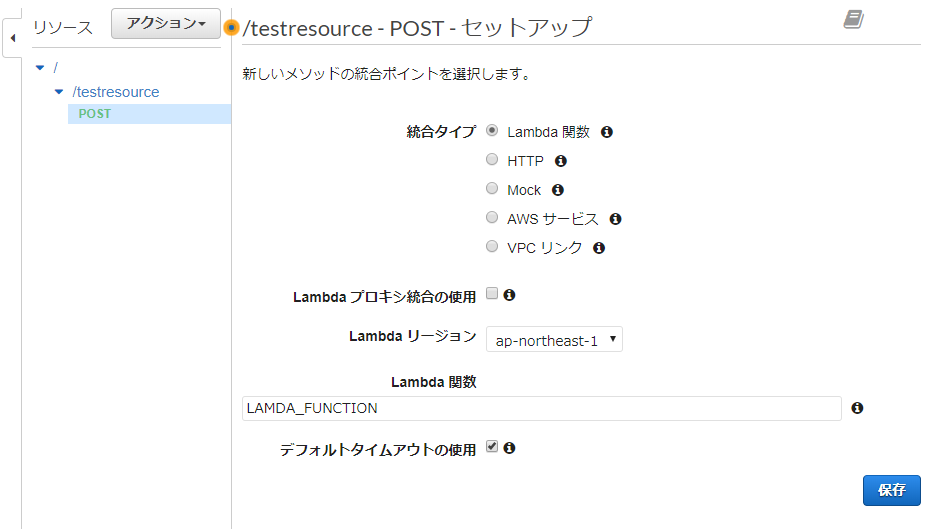
Lambda関数の部分は、前回作成したLambdaの関数名を入力。
保存
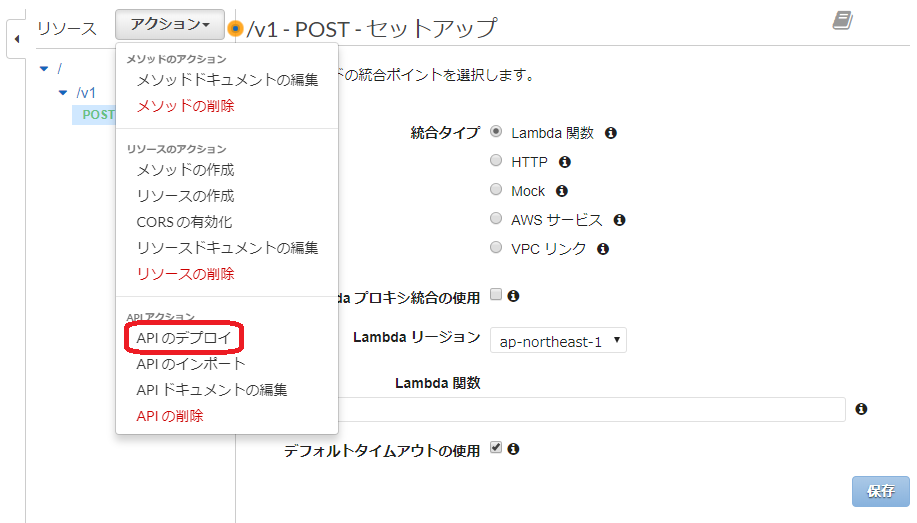
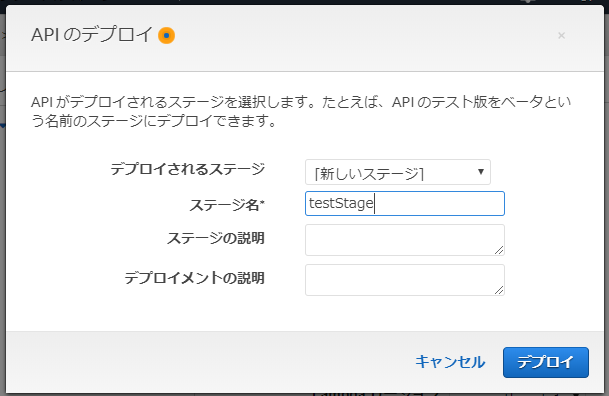
APIのデプロイ!!
[アクション]からAPIのデプロイを選択。
新しいステージを作成。名称は任意で。
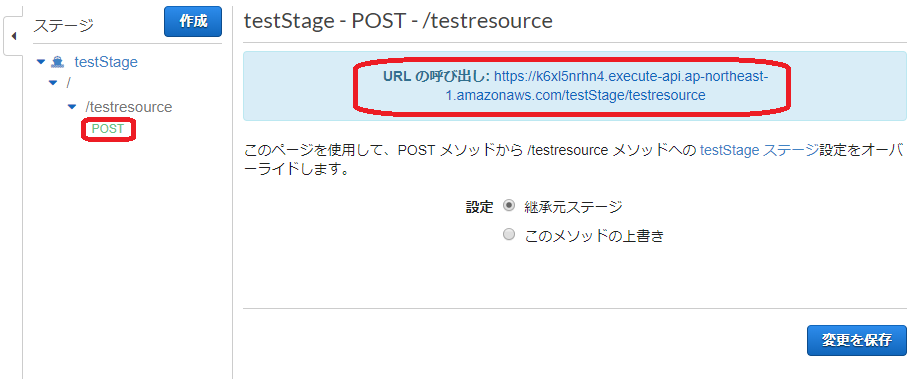
ステージのPOST以下を開いてURLの呼び出しを確認。
これが、Webhookに指定するURLになります。
最後に、Webhook URLの設定を行います。 再び、LINE Developersサイトへアクセスして、LINEチャネルを開いて、
Webhook送信:利用する Webhook URL:↑のAPIのデプロイの最後で取得したURLを貼り付け
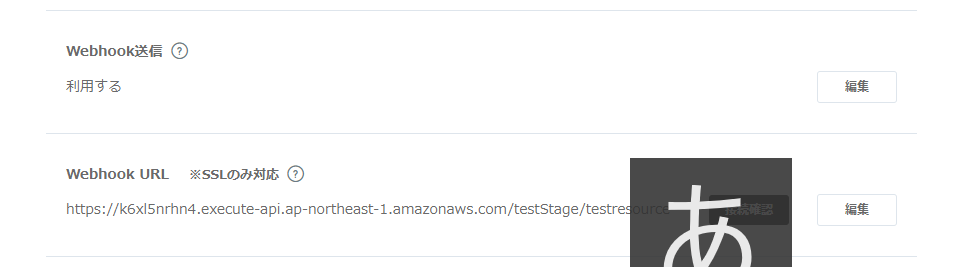
接続確認をクリックして、正常に終了すれば問題なし。
これで、LINEアカウントへメッセージを送ると、オウム返しに返事が来きます。
LINE ボットを作る -LINE Messaging API と AWS Lambda を連携させる- その2
AWS Lamda 関数作成
AWS Lambda の関数を開いて、[関数の作成]

[一から作成]、今回はPython3.6を選択。
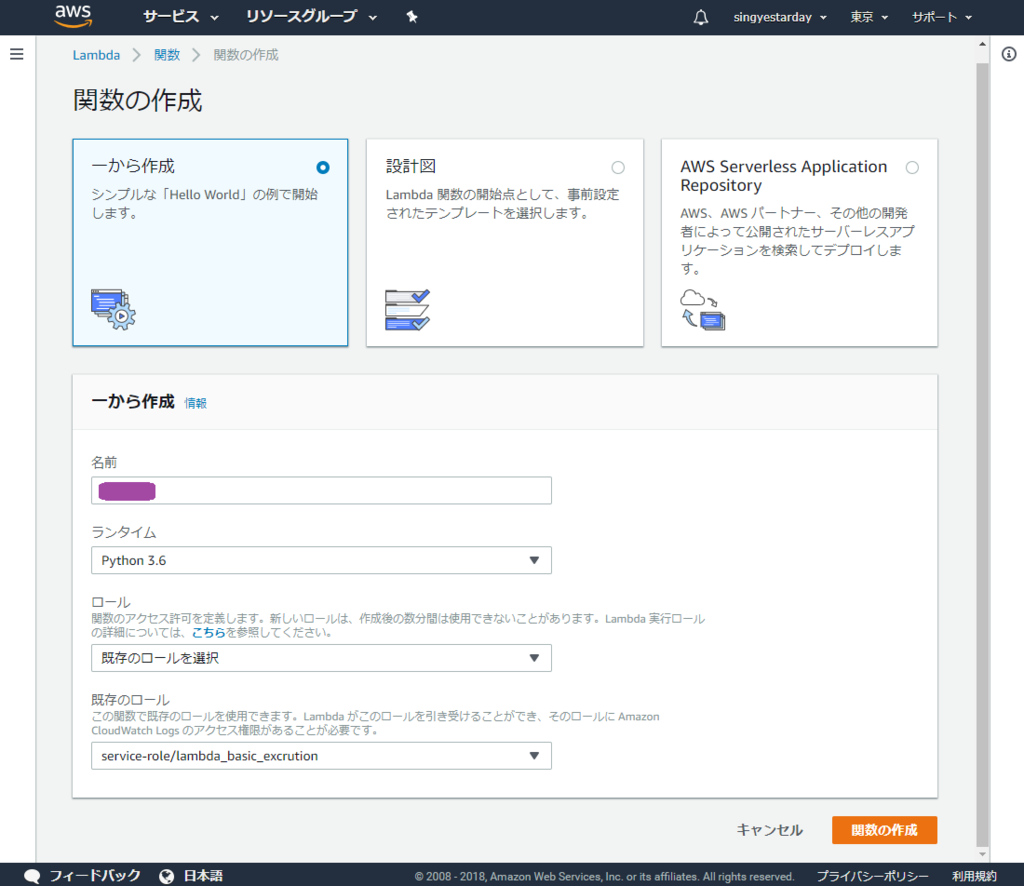
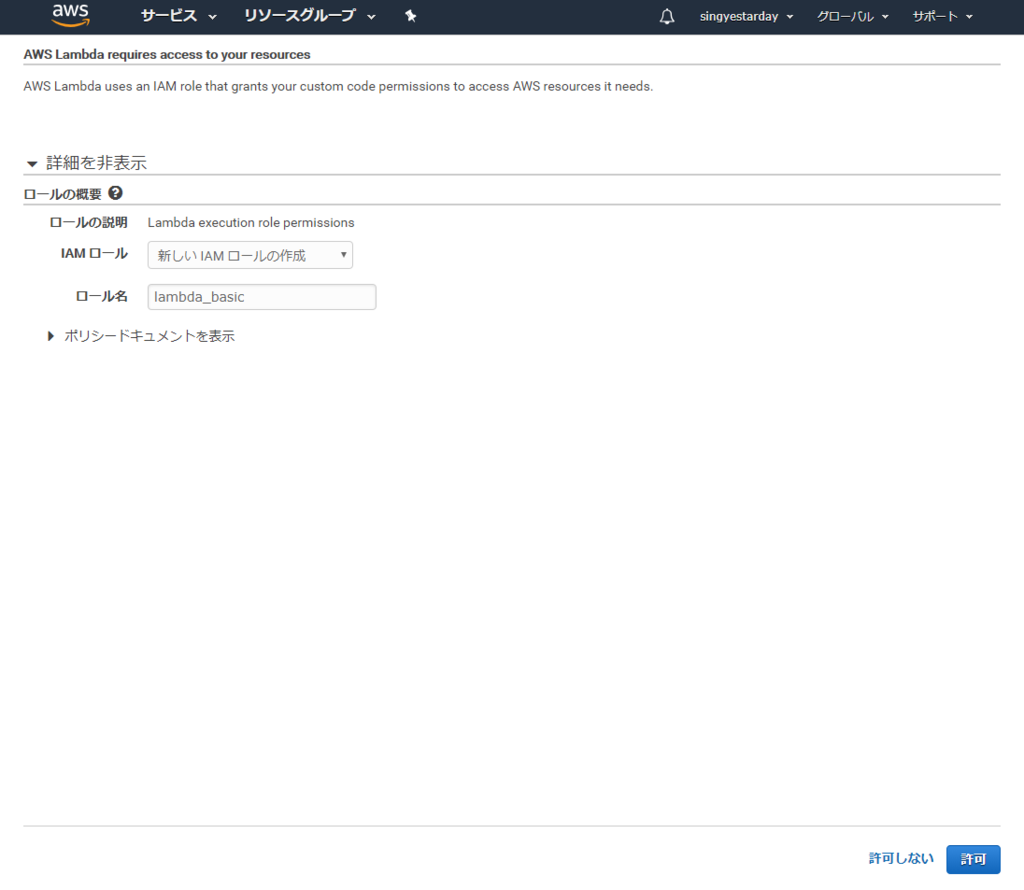
ロールの設定が必要になりますが、特別に必要な権限はないとので、新規で作成します。
[カスタムロールの作成]を選択。作成します。
Python コーディング
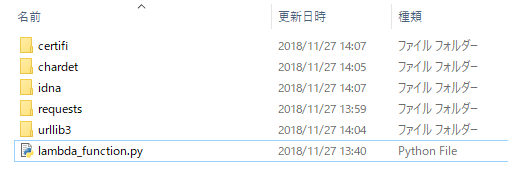
まずは必要なライブラリをDLします。
上記のライブラリファイルと、「lambda_function.py」をローカルに保存。
ソースコードの内容は以下。
☆ACCESS_TOKEN 部分は、前回作成したLINEチャネルのアクセストークンを入力。
# -*- coding:utf-8 -*-
from __future__ import print_function
import requests
import json

# 定義
LINE_API_ENDPOINT = 'https://api.line.me/v2/bot/message/reply'
ACCESS_TOKEN = [おのおののアクセストークン]

LINE_API_HEADERS = {
    'Authorization': 'Bearer ' + ACCESS_TOKEN,
    'Content-type': 'application/json'
}


# ---------------------------------------------
# Webhook用ハンドラー
# ---------------------------------------------
def lambda_handler(event, context):

    request_json = event

    reply_token = ''
    text = ''
    payload = ''

    for e in request_json['events']:

        # イベントタイプの判断
        event_type = e['type']

        # メッセージイベント時
        if "message" == event_type and "message" in e.keys():

            reply_token = e['replyToken']   # 返信先トークン
            text = e['message']['text']     # 送られてきたメッセージ

            # 返信用のオブジェクト
            payload = {
                  "replyToken":reply_token,
                  "messages":[
                        {
                             "type":"text",
                             "text": text
                         }
                    ]
            }

            break

        # 最初の友達登録時、ブロック解除時など
        else:
            reply_token = e['replyToken']

            # 返信用のオブジェクト
            payload = {
                  "replyToken":reply_token,
                  "messages":[
                        {
                             "type":"text",
                             "text": event_type
                         }
                    ]
            }

    #リプライメッセージの送信
    requests.post(LINE_API_ENDPOINT, headers=LINE_API_HEADERS, data=json.dumps(payload))

    return
以上。
LINE ボットを作る -LINE Messaging API と AWS Lambda を連携させる- その1
ひとまず、何を送っても、ハロー、とだけ返すボットを作りたいと思います。
LINE Business ID 作成
LINE Developersにアクセスして、ログイン。
Developersアカウントが無い場合は登録してください。
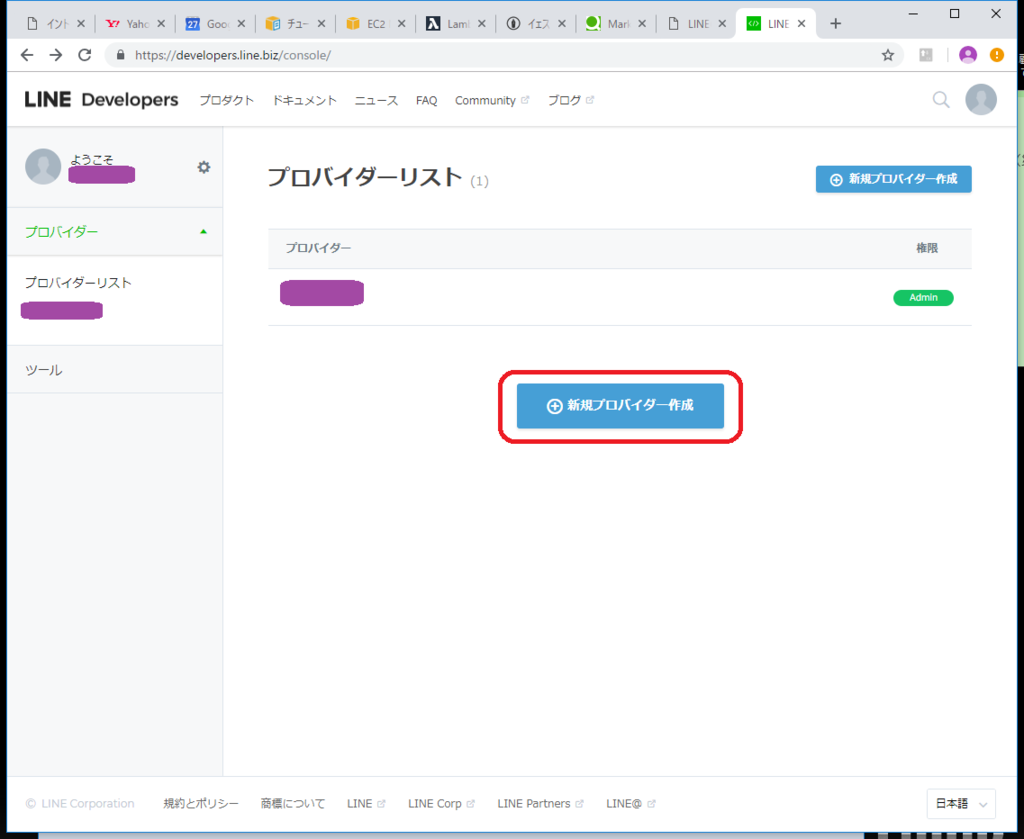
ログインしたら、[新規プロバイダー作成]
たぶん、アカウント管理するときのグループのようなもの。
プロバイダーが作成できたら、次は[新規チャネルの作成]
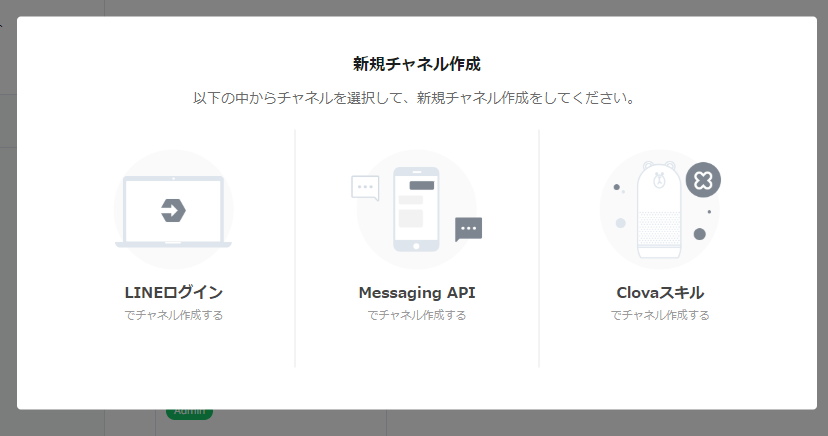
アプリアイコン画像以外は、入力が必要です。 プランは、Developer Trialとフリーの二種類がありますが、今回はフリーにしました。
大きな違いは、Developer Trialは、
友達登録人数に制限がある(50人まで)
Push APIが使える(個別にメッセージを送れる)
かなと思います。
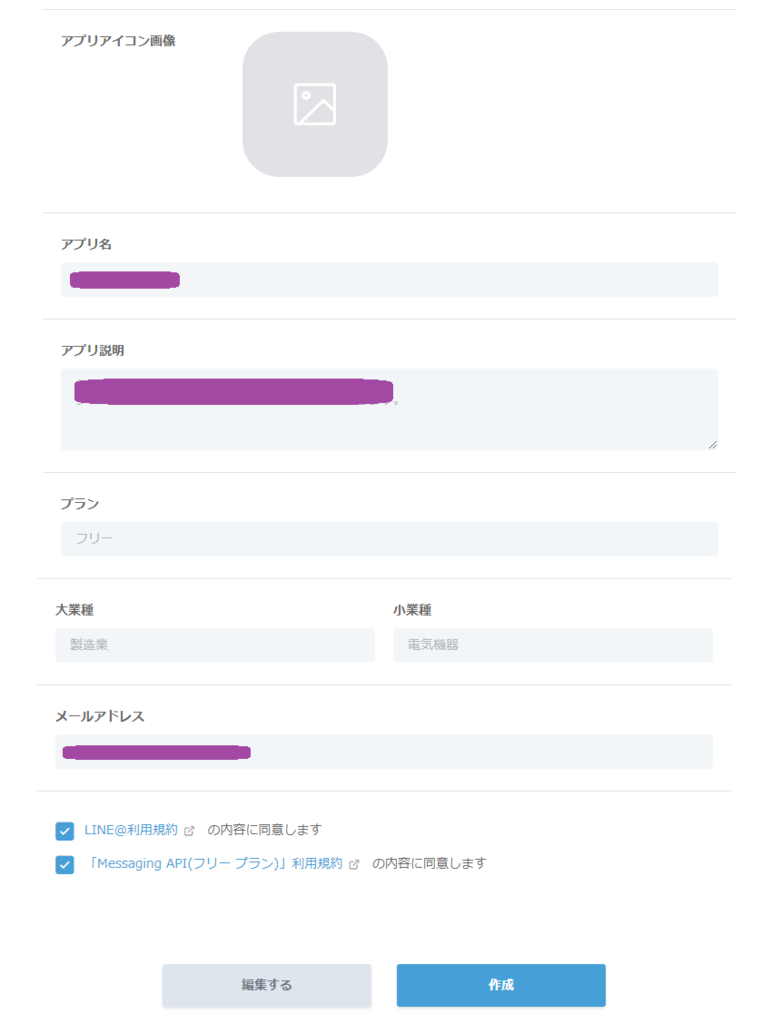
他は適当に入力。
同意チェックボックス二つにチェックを入れて、作成。
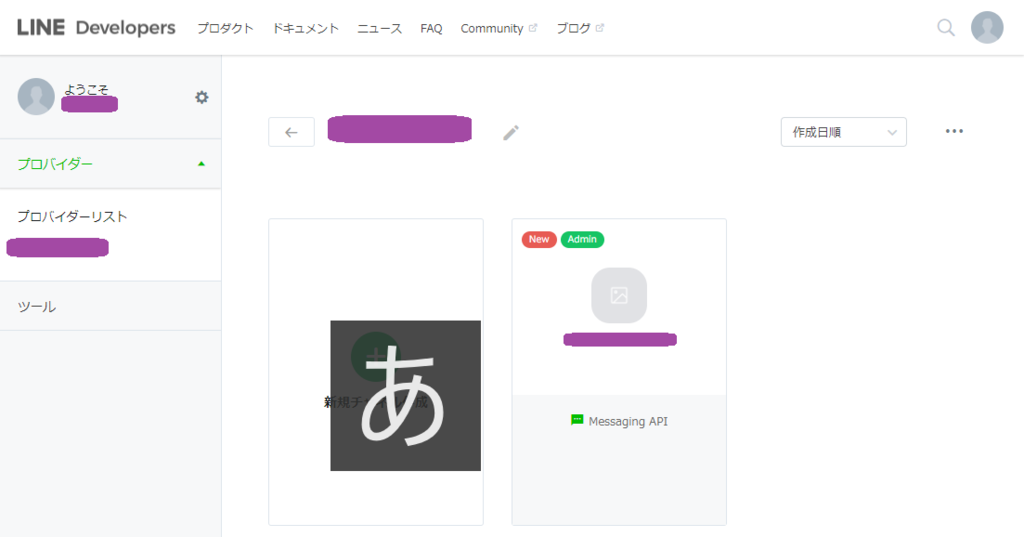
チャネルができたら、アクセストークンを発行します。 作成したチャネルをクリックして設定画面を開き、アクセストークン(ロングターム)の[再発行]をクリック。
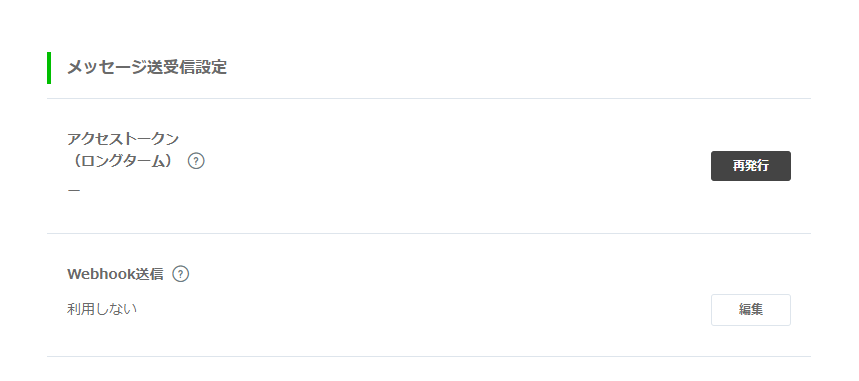
アクセストークンは、後ほどLambdaでプログラム作成する際に使います。
ちなみに、その下にある[Webhook送信]は後で設定します。
最後に、自動応答メッセージは、利用しない、に変更します。
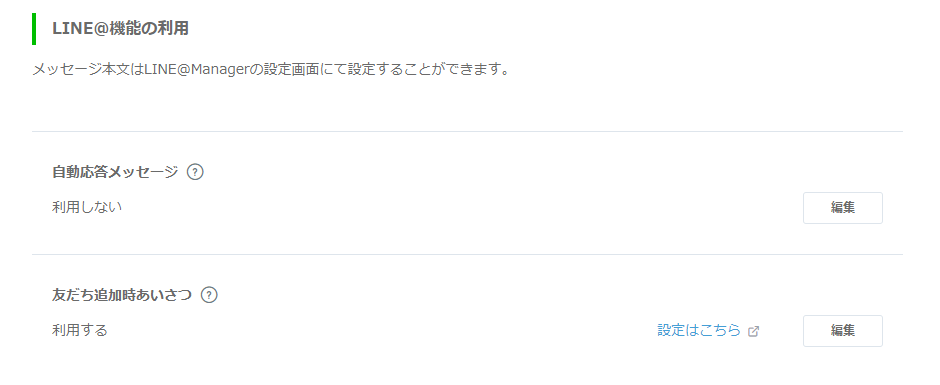
以上、でアカウント作成が完了です。
次回は、作成したLambdaの設定について。
Docomo 雑談APIの提供終了…
表題の通り、気が付いたらDocomo様の雑談APIがサービス終了してました…
再三メールでお知らせは来ていたと思いますが、割とスルーして。 LINE BOTがバカっぽい返しをしてくれなくなってようやく重い腰を上げました。
というわけで、雑談APIから自然対話:雑談API(ややこしい)へ移行。Pythonです。
まずは、Docomo Developer Support からAPI申請を。 新規アプリの登録で諸々入力して次へ。 APIはとりあえず、法人登録不要のものは一通り申請してみました。
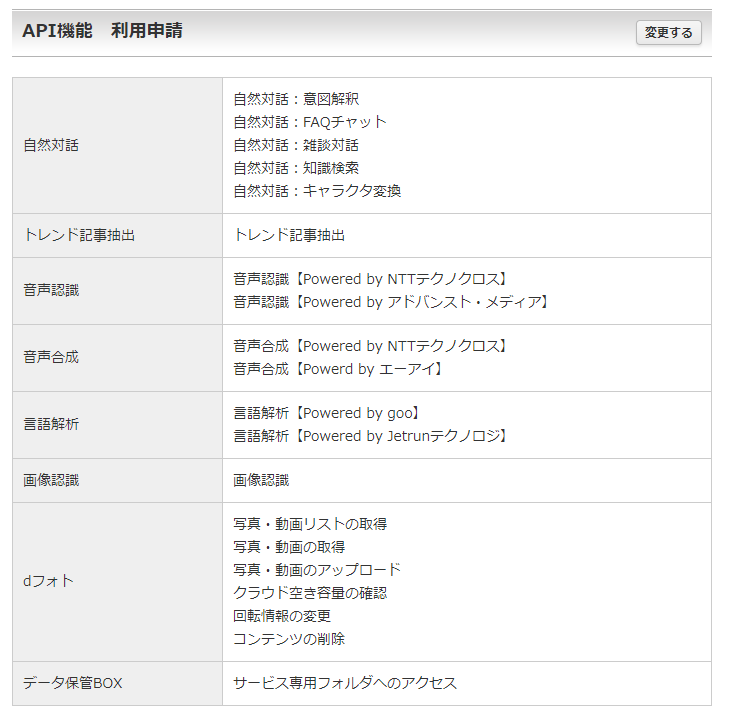
申請は特に問題なく終了。。。 続いて、Pythonでコードを変更します。
Pythonソースコード変更
変更というか、そもそも今回は、「ユーザ登録」という概念が追加になっています。
ユーザ登録といっても、メールアドレス登録とかではなく、固有のID(appId)を取得するだけです。
このappIdを統一することで、単発の受け答えでなく、会話を続けるようになっています。
以前の、context の代わりっぽいです。 あとは、、、mode がBase64 URLエンコーディングされています。ここ注意。
で、一応コードは↓のように変更。
# 定義 ------------------------------
# インポート
# -----------------------------------
import requests
import json
import base64
from datetime import datetime

VER = 'VER 2.0'

KEY = 'xxxxxxxxxxxxxxxxxxxxxxxxxxxxxxxxxxxxxxxxxxxxxxxxxxxxxxxxxxxxxxxxxxxxxxxxxxxxxxxxxxx'

class DocomoChat():

    # バージョン表示
    print ('Docomo Talk Class -> ' + VER)

    # ---------------------------------------------
    # 登録(appIdの取得)
    # ---------------------------------------------
    def resistration(self, appKind):

        endpoint = 'https://api.apigw.smt.docomo.ne.jp/naturalChatting/v1/registration?APIKEY=REGISTER_KEY'
        url = endpoint.replace('REGISTER_KEY', KEY)

        headers = {'Content-type': 'application/json'}

        payload = {
                "botId": "Chatting",
                "appKind": appKind
            }

        r = requests.post(url, data=json.dumps(payload), headers=headers)
        data = r.json()

        return data["appId"]

    # ---------------------------------------------
    # 雑談APIの呼び出し(最小限)
    # ---------------------------------------------
    def talk(self, message, mode, appId, time=""):
        # REST URL
        endpoint = 'https://api.apigw.smt.docomo.ne.jp/naturalChatting/v1/dialogue?APIKEY=REGISTER_KEY'
        url = endpoint.replace('REGISTER_KEY', KEY)

        headers = {'Content-type': 'application/json'}

        # リクエストボディ(必須のみ)
        payload = {
            "language":"ja-JP",
            "botId":"Chatting",
            "appId":appId,
            "voiceText":message,

            "appRecvTime":time,
            "appSendTime":datetime.now().strftime('%Y-%m-%d %H:%M:%S')
          }

        r = requests.post(url, data=json.dumps(payload), headers=headers)
        data = r.json()

        # レスポンスの中身

        #テキスト
        response = data['systemText']['expression']
        #モード(会話 or しりとり)
        mode = json.loads(base64.b64decode(data["command"]))['mode']
        #時刻
        time = data['serverSendTime']

        return response, mode, time
これを、↓のように呼べば雑談できるかと。
#-----------------------------------
#  動作確認用メイン関数
#-----------------------------------
if __name__ == '__main__':
    #クラス宣言
    TALK = DocomoChat()

    #登録
    appid = TALK.resistration("dempachan")

    print(appid)

    message = ''
    mode = 'dialog'
    time = ""

    while message != 'バイバイ':
        message = input('私 : ')
        res, mode, time = TALK.talk(message, mode, appid, time)
        print (res)
mode、レスポンスで取得してますが、↑の呼び出しでは意味なし。しりとりするときに必要かも、と思ったので一応。
以上で移行完了。
Visual Studio Code で PHP開発環境
WindowsでPHP開発する場合の環境構築方法メモです。WINDOWSです。
参照サイト
Visual Studio Code で快適な PHP コーディングを行う
PHPのインストール
ここから最新のPHPをダウンロード。自分の環境に合った、Thread Safe 版を。Cの直下に解凍。

↑な感じ。
配置後、パスを通します。 マイコンピュータ 右クリック > プロパティ > 詳細設定タブ > 環境変数
Path を選択 > 編集 > 新規 > C:\php-7.2.6-Win32-VC15-x64
を追加。バージョンやビットは各々の環境に合わせてください。
PHP.ini ファイル作成
バージョンによって(?)解凍したフォルダの中にphp.iniファイルがないので、ひな形から作成します。

↑のように、
のどちらかをコピーして、ファイル名を php.ini へ変更。開発環境よりのひな形か、実行っ環境よりのひな形かの違い。らしいですが、初心者にはわかりませんでした。今回は、developmentから、php.iniを作成しました。
作成したphp.ini の末尾に以下を追加
; Whether to allow the treatment of URLs (like http:// or ftp://) as files.
; http://php.net/allow-url-fopen
allow_url_fopen = On

; Whether to allow include/require to open URLs (like http:// or ftp://) as files.
; http://php.net/allow-url-include
allow_url_include = Off

extension_dir = "C:\php-7.2.6-Win32-VC15-x64\ext"

extension=php_fileinfo.dll
extension=php_gd2.dll
extension=php_intl.dll
extension=php_mbstring.dll
extension=php_mysqli.dll
extension=php_openssl.dll
extension=php_pdo_mysql.dll
extension=php_pdo_sqlite.dll
extension=php_sqlite3.dll
Visual Studio CodeにPHPを追加
Visual Studio Codeを起動。 Ctrl + Shift + X を押して拡張機能の管理を開く。

検索窓に、PHP を打って検索。
PHP Debug PHP IntelliSense
を探してインストール。
ワークスペース作成
ファイル > フォルダを開く > PHPのソースファイルがあるフォルダを選択
ファイル > 名前を付けてワークスペースを保存
以上でワークスペースが作成される。
次に、実行設定。Shift + Ctrl + D を押してデバッグメニューを開く。
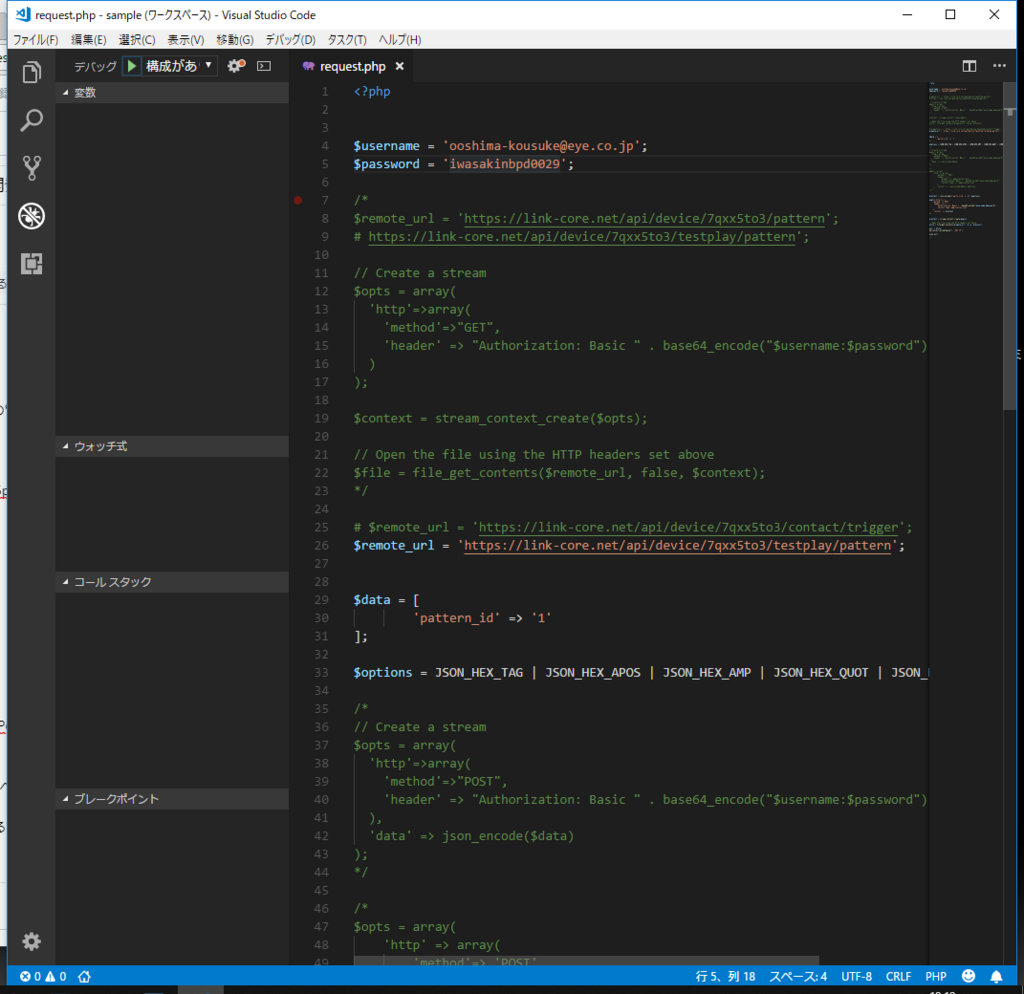
メニューから歯車マークを押して、PHPを選択。 lunch.json の編集画面が開くので、"name": "Launch currently open script" の項目に以下を追加。ここも、php.exeのパスは各々の環境に合わせて。
"runtimeExecutable": "C:\\php-7.2.6-Win32-VC15-x64\\php.exe"
設定後は↓の感じ。
{
    // IntelliSense を使用して利用可能な属性を学べます。
    // 既存の属性の説明をホバーして表示します。
    // 詳細情報は次を確認してください: https://go.microsoft.com/fwlink/?linkid=830387
    "version": "0.2.0",
    "configurations": [
        {
            "name": "Listen for XDebug",
            "type": "php",
            "request": "launch",
            "port": 9000
        },
        {
            "name": "Launch currently open script",
            "type": "php",
            "request": "launch",
            "program": "${file}",
            "cwd": "${fileDirname}",
            "port": 9000,
            "runtimeExecutable": "C:\\php-7.2.6-Win32-VC15-x64\\php.exe"
        }
    ]
}
以上で実行できるはず。。。
もしかしたら、この後 Visual Studio の再起動が必要かも。。。
VMWare で Ubuntu
Intel Computer Vision SDK を使ってみたい
と思ってIntel様のセミナー参加しました。 正直言うと、ハードル高ったです。。。 むつかしい。
そもそも開発環境が、ubuntuでした。 私のPCはWindowsなので仮想環境から作ります。
- ということでまずは、ubuntuのインストール方法
VMWare Playerはインストール済みだったので、ubuntuの.isoイメージをダウンロードしてトライ。
ダウンロードは、こちらから。 日本語 Remix イメージのダウンロード、をダウンロード。 (1.3Gくらいあるので気長にまちましょう)
次にVMWare Player起動して 「新規仮想マシンの作成」-> インストーラディスクイメージファイル(iso)を選択 -> さきにダウンロードしたubuntuの.isoイメージを選択
あとは、流れで次へ、次へ...としてるとインストール始まります。ここも時間がかかるので気長に。
以上で一応、ubuntu環境はOK
かな。
